
Real time polling with Ably Realtime
Realtime to the rescue
Buckle up for a demo about how to use Ably realtime with our Cyclic Nest.js typescript starter. But first, before we dig into the demo, let's make sure everyone knows how great realtime APIs are. Realtime API's allow you to have the functionality of websockets in a serverless infrastructure. WOW!
Maybe you are wondering why websockets don’t work on Cyclic currently. It’s worth reviewing.
I’ll paraphrase our docs on the subject. Serverless functions are listening exactly when they are called and not any other time. They aren’t just kicking around, doing whatever, waiting for requests to come down the pipe. It makes serverless very efficient, but incompatible with websockets. Websockets require a “persistent bi-directional link”, or more simply, a line that’s always open.
There’s a potential future in which these two technologies meet and work together fine, but in the meantime, we have a solution that is just as lovely and, if you ask me, is easier to configure.
Enter realtime APIs. The concept with realtime APIss is that they connect publishers and subscribers(pub/sub) on API channels. The data created on your application is pushed to the channel and anyone who has access to the subscription can see it. As you can imagine, this can be very simply applied or very complex. For the sake of this demo we are going to go VERY simple.
If you'd like to learn more about how realtime APIs work, I'd recommend the Ably docs, which even have some helpeful graphics.
Let's put this tech into action...
Here’s the demo
We’re going to create a poll that updates in real time. We’re going to let anyone with our frontend link vote on their favorite midnight snack. They will be able to vote multiple times and see the changes instantly in our frontend site. We’ll be using the Cyclic Nest.js Starter to set up the project and because the frontend is very simple, we’ll be templating it with EJS. Throwback!
You can fork that starter here, if you’d like to follow along:

You can name the project whatever you like, I called mine "ably-nest-poll".
The Setup
Once you have the starter safely cloned to your local environment, make sure to kick things off with an npm install in the terminal.
Let’s talk briefly about NestJS start scripts. Because we’re using NestJS, the start script will run out of the /dist folder. If you just created the project you won't have that folder, because you have to run npm run build to create it.
Anytime you want to see what your project will look like in production, run npm run build in the terminal, then once the /dist folder appears, you can run npm run start to see the current version of the application. Awesome.
Ok, now, while we’re working on the application, use npm run start:dev to see the project update as you go on your https://localhost:3000. Because it uses the --watch flag it will operate like npm module Nodemon, if you’ve used that previously.
Let's move on to the Bootstrap
In NestJS the file that operates as a server is the main.ts. We'll use this to bootstrap our application. Anyone familiar with MVC will be comfortable with the use of "controllers" and "views" coming up. Almost everything we'll use for this project will reside within the /src folder, as does main.ts.
Inside main.ts we'll import our modules and then apply them to our bootstrap function. We'll also give the funtion access to the static assets in the /public folder and access to the views in the /views folder. We also need to set EJS as the views engine. The NestFactory module creates the NestJS application, so that's pretty important too.
import { NestFactory } from '@nestjs/core';
import { NestExpressApplication } from '@nestjs/platform-express';
import { AppModule } from './app.module';
import { join } from 'path'
import { config } from 'dotenv'

async function bootstrap() {

  config()

  const app = await NestFactory.create<NestExpressApplication>(AppModule);

  app.useStaticAssets(join(__dirname, '..', 'src/public'));

  app.setBaseViewsDir(join(__dirname, '..', 'src/views'));

  app.setViewEngine('ejs');

  await app.listen(3000);
}

bootstrap();
That does it for the main.ts. Now we can start to set up the folders we are referencing.
Now create the app structure
We've already established that the whole file structure for this application will reside inside the /src folder. So let's set it up.
Inside /src create a folder called /views. Inside /views, add a new file and name it index.ejs. This will have the template for how your frontend looks.
Also inside /src create a folder called /public. Inside /public, add a new file and name it main.js. This will have your clientside JavaScript.
Finally, add a /poll folder. Add two TypeScript files to this folder: poll.controller.ts and poll.service.ts. We'll come back to these when we add the functionality for our poll. Woo!
Now that we've got our structure laid out, let's get to coding.
Setting up the view
Inside the index.ejs file you just created, we'll start to set up how our poll looks. The nice thing about EJS is that it looks almost exactly like HTML with just a little flavor thrown in to make your data visible.
First up, for the head and metadata, we'll include a styling CDN from materialize:
<!DOCTYPE html>
<html lang="en">
    <head>
        <meta charset="UTF-8">
        <meta name="viewport" content="width=device-width, initial-scale=1.0">
        <meta http-equiv="X-UA-Compatible" content="ie=edge">
        <link rel="stylesheet" href="https://cdnjs.cloudflare.com/ajax/libs/materialize/0.100.2/css/materialize.min.css">
        <title>Realtime Snack Poll</title>
    </head>
Then we have the body which is the form input for the user and then the results graph output from our Ably connection.
    <body>
        <div class="container">
            <h1> Favorite Midnight Snack </h1>
            <p> Select your favorite snack </p>

            <form id="opinion-form">
                <p>
                    <input type="radio" name="snack" id="cheese" value="Cheese">
                    <label for="cheese">Cheese</label>
                </p>

                <p>
                    <input type="radio" name="snack" id="chips" value="Chips">
                    <label for="chips">Chips</label>
                </p>

                <p>
                    <input type="radio" name="snack" id="chocolate" value="Chocolate">
                    <label for="chocolate">Chocolate</label>
                </p>

                <p>
                    <input type="radio" name="snack" id="other" value="Something Else">
                    <label for="other">Something Else</label>
                </p>
                <input type="submit" value="Vote" class="btn btn-success"/>
            </form>

            <br><br>
            <div id="chart-container" style="height:300px;width:100%;">

            </div>
        </div>
Finally we'll close with some scripts to make it work smoothly. The main things to pay attention to here is the Ably cdn and the final script which connects to our main.js.
        <script src="https://code.jquery.com/jquery-3.3.1.js" integrity="sha256-2Kok7MbOyxpgUVvAk/HJ2jigOSYS2auK4Pfzbm7uH60=" crossorigin="anonymous"></script>
        <script src="https://cdnjs.cloudflare.com/ajax/libs/materialize/0.100.2/js/materialize.min.js"></script>
        <script src="https://cdnjs.cloudflare.com/ajax/libs/axios/0.17.1/axios.js"></script>
        <script src="http://cdn.ably.io/lib/ably.min-1.0.js"></script>
        <script src="https://cdnjs.cloudflare.com/ajax/libs/canvasjs/1.7.0/canvasjs.min.js"></script>
        <script src="/main.js"></script>
    </body>
</html>
The view is good to go... let's start to set up our data.
Setting routes i.e. controllers
In NestJS routes are handled by controllers, which is nice. We're going to start by going to app.controller.ts to add to the default @Controller so we can render start to render any data to our index file.
Add Res to the first import at the top like this:
import { Controller, Get, Res } from '@nestjs/common';
And then within the AppController class block, add a second @Get that looks like this:
@Get()
root( @Res() res ) {res.render('index');}
While we're in the business of setting up controllers, let's add some code to the poll.controller.ts file as well.
At the top of the file, copy the following:
import { Controller, Post, Res, Body } from '@nestjs/common';
import { PollService } from './poll.service';
We know there's nothing in poll.service.ts yet, but there will be soon!
Next we'll create the poll controller, inject the poll service, and create an async vote function within a Post, because this is serverless after all.
@Controller('poll')export class PollController {

constructor(private pollService: PollService) {
    }

@Post()
    async submitVote(@Res() res, @Body() poll: string ) {
        console.log(typeof poll)
        await this.pollService.create(poll);
        return res.render('index');
    }
}
Ably set up, so easy!
It's time to take a little break from this delightful coding demo to make sure you know how to set up Ably. You could use any number of realtime API services, but we use Ably and it is very easy to implement.
There are just a few steps.
- You go to ably.com.
- Sign up for a free account.
- Select the name of your project.
- Then you can access your API keys.
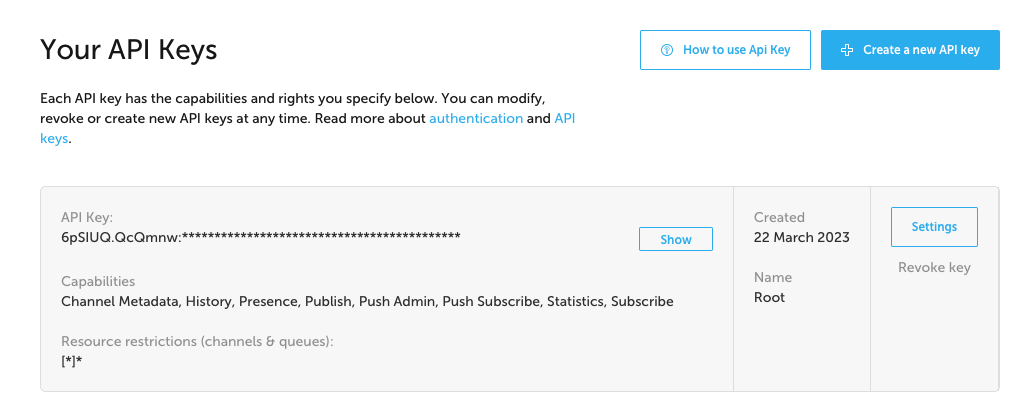
There are multiple keys on the same account because you can configure each key to have different permissions on your Ably channel (Remember, realtime APIs allow publishing and subscribing to the same channel?). You want the root key on the backend of your application.
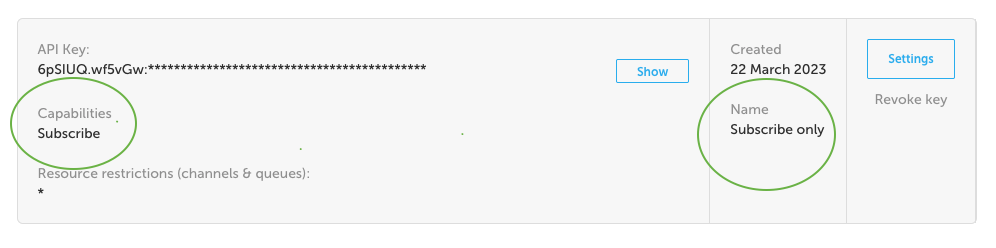
And you want the subscribe-only key on the frontend. We'll be adding it to the poll.service.ts and the main.js. You can see the permissions for the key clearly labeled on the left under "capabilities" and on the right under "Name".
Once you have the API key you will be able to make everything with Ably work in your local environment. However we haven't installed Ably or EJS yet, so enter npm install ably ejs and then we'll be ready for the next step.
Connect Ably to the poll
Now that Ably is installed and we've got keys, let's return to our poll. Go to the poll.service.ts and start with the following:
import { Controller } from '@nestjs/common';

@Controller()export class PollService {
    private poll: string;

async create(poll) {
    const ably = require('ably');

    // replace ABLY_SUBSCRIBE_KEY with your API Subscribe key (second default key in Ably)
    const ablyclient = new ably.Realtime(ABLY_SUBSCRIBE_KEY);
The reason we use the subscribe key here is because users need to subscribe to the channel to see updates, but we don't want them to be able to publish or change our API settings.
Finish poll.service.ts with the following:
const channel = ablyclient.channels.get('ably-nest');

    const data = {
        points: 1,
        snack: poll.snack
    };

    await channel.publish('vote', data);
}
}
Don't forget to save! The channel is what users are subscribing to, we called it ably-nest but you can name it whatever you like. The publish method takes in two parameters, the optional message event name and the second is the payload to be publish, which is this case is our data.
Hooking everything up
Currently we have a poll, poll service, and beautiful front end, but it has nowhere to go. So let's connect all these wires.
In the app.module.ts, we need to import the PollController and the PollService and then add them to their respective arrays in the @Module below.
import { PollController } from './poll/poll.controller';
import { PollService } from './poll/poll.service';
and
@Module({
  imports: [],
  controllers: [AppController, PollController],
  providers: [AppService, PollService],
})
The last thing we need to do is get our clientside Javascript working and this midnight snack will be ready to eat.
Head over to main.js and we'll start with the basics. We'll getElementById from the index.ejs. Then we have an event listener to pick up the snack the user selected.
const eventform = document.getElementById('opinion-form');

eventform.addEventListener('submit', (e) => {
    const choice = document.querySelector('input[name=snack]:checked').value;const data = {snack: choice};

    axios.post('/poll', data).then( (data) => {
        console.log(data);
    });
    e.preventDefault();
});
Next we'll start to plot our graph of answers, first by creating chart for the answers and asking Ably to update them in REAL TIME.
let dataPoints = [{label: 'Cheese', y: 0},{label: 'Chips', y: 0},{label: 'Chocolate', y: 0},{label: 'Something Else', y: 0},];

const chartContainer = document.querySelector('#chart-container');

if (chartContainer) {
    const chart = new CanvasJS.Chart('chart-container', {
        animationEnabled: true,theme: 'theme1',title: {text: 'Midnight Snacks'},data: [{type: 'column',dataPoints: dataPoints}]
    });

    chart.render();

        //insert your subscriber ABLY key
    const Ably = new Ably.Realtime(ABLY_SUB_KEY);
    const ably = ably.channels.get('ably-nest');
    channel.subscribe('vote', function(poll) {

        dataPoints = dataPoints.map(x => {
            if (x.label == poll.data.snack) {
                x.y += poll.data.points;
                return x;
            } else {
                return x;
            }
        });

        chart.render();

    })
}
That's it! Now test it out. Try npm run build and then npm run start. You should be able to open two screens at https://localhost:3000 side by side and see the snack wars go down as you make votes on either screen.
To make this fully functional for production, an upgrade would be to save votes to a database where users anywhere would be able to vote in real time and see live updates.
Want to see the up-to-date code for this application? Check it out here: (link to repo) Submit a PR if you have any ideas about how to make this small project bigger and better.
Share your successes with realtime APIs or other NestJS projects in our Discord server.
We'll see you there!
Subscribe to posts
Enter your email If you would like to get an email the next time we post.
We post about ~1-2x per month, and up to once a month about company news.

Launch a hello world
Fork and deploy a hello world project onto Cyclic faster than it has taken to read this page. Experience the power.
Deploy on Cyclic 🚀